Pages

Thursday, September 30, 2010

I have exciting news!

I just recieved the "One Lovely Blog Award" from Support Blog for Moms of Boys

How sweet is that!?

 Thank You I am thrilled to recieve this and honored to be able to pass it on!


Here are 5 Blogs that I am excited to have recently found!


Here are the rules to accept the award....
1. Post it on your blog with the name of the person who has granted the award and his or her blog link.
2. Pay it forward to 5 other bloggers that you have newly discovered.
3. Contact those blog owners and let them know they have been chosen.


Wednesday, September 29, 2010

Thrifty Finds Special Edition

Today was a very special day today in my "neck of the woods"!  I bet you are wondering why and I'm going to tell you. 

On my way to take my oldest to school this morning I noticed that is was...drum roll please....Trash haul off day!!!!  And yes I did!  And yes, I was one of those who participated in raiding my neighbors trash.  I like to think of it as going easy on my pocket book by looking for thrifty finds somewhere other than my local thrift store. { Insert big cheesy smile here }.

Well, actually I kinda tried to pull it off without everybody staring at me and I am ashamed to say I was "a lil' embarrased" {hangs head}.  So I pulled up to said curb hit the button to raise the trunk of my van, got out ran over and attempted to throw the goods in the back, Unnoticed.  Then ran back and about the time I started to get back in the van to hit the button to close the trunk so that I could blow that popsicle stand...I heard it fall out of the back of the van and onto the road!  So much for incognito!!! 

You would think that would be enough embarrassment for one day but a couple houses down I spotted this awesome mirror that I had to have.  However, the house that it was sitting in front of was getting a new roof and there were people all over it.  I did not pass it up or try to grab it and run.  I was very proud of myself I simply got out and put it in the van. 

So here is the loot:

      Love this mirror! Will propably end up above my fireplace mantel.

Some new pulls a little paint.  It has potential!

I ended up with it sitting beside me in the passenger seat and is now safe in my garage waiting for its chance at a new life:)


I will be linking this to the parties in my sidebar.

Monday, September 27, 2010

Table Makeover

                                                    
Remember this table I showed you in my Thrifty Finds Post? The twenty dollar one with the cute little legs!


Well, after I got it home and went to work on it I started to think that perhaps I had just flushed twenty of my hard earned bucks down the drain.  Oh yes it was THAT bad!  Every screw that was in it was hanging at least half of the way out and the leaves were not flush with the rest of the table.  One of the leaves was so warped I had to trash it all together.  Sniff.  Sniff.

So after MUCH tightening and MUCH sanding and priming,  I started to think that perhaps it might have some potential after all. Maybe. 

I already knew that I wanted it a gray color so off I went to the Home Improvement store to find the perfect one.  I decided on Valspar's Vintage Gray.  I mixed the paint and some water to get a very thin, watery consistency.  Then I just brushed it on going with the direction of the wood grain and immediately wiped it off with a towel; Just like you would a stain.  I went over the table 2 times using this technique.  After letting it dry I went over it with an antiquing glaze, immediately wiping it off as well.


And here is how the finish turned out.  It is hard to tell in the pics but you can still see the wood grain in it.


This is what it looked like with the antiquing glaze on it before wiping it off.  I used a foam brush making sure to get into all the spindles on the legs.


 I used sand paper to distress it around the legs and finished it off with a Satin finish Poly.  I love the worn look, like it has been used in an old farmhouse for many delicious Sunday breakfasts!


And here she is! 


 I think in the future I will add a board to fill in the gap in the aprons that is created when the leaves are added but,
 I really love how it turned out and can totally see it with some of these Darling chairs!  Can't You!? 

I will be Linking this post to the parties in my sidebar...and to Primitive and Proper;)

Friday, September 24, 2010

The Boys Room

Last week I shared with you my youngest, daughters room

 This week we are so excited to almost have it all decorated and  would like to thank every body for all the encouragement and sweet comments!  We have had so much fun with it and it is coming along well.  Everything has just seemed to fall into place exactly how I wanted it to! (don't you just love when that happens!)


This week I am equally as excited to share with you the second of the kids rooms to be finished... the boys room

 My two youngest are both boys and will be sharing this transportation themed room.  The inspiration for this room came from this gorgeous little boys room.  I just love the white slip covered bed. It is so crisp and clean looking  paired with the candy, apple green and red.  Unfortunately with my messy little monsters it would not look quite so crisp and clean at my house.  There is no amount of bleach or optical whiteners that could save it!

For this room Martha Stewart's Hydrangea was used on the ceiling and to paint the area above the road. Under the road we used Behr's Cantaloupe Slice. 


We trimmed out the road using very thin trim. We mitered the corners and used a nail gun to attach it.  


I know that fans are not a popular design choice but, after reading how they may actually decrease SIDS I knew that I wanted one in the babies room.  And when I saw how this fan mimics a propeller and adds to the fun transportation theme I was sold on it!  It has actually become one of my favorite elements of the room.   


If you have any questions feel free to ask! Thanks for stopping by!

I am linking this to some of the parties in my sidebar this week:)

Wednesday, September 22, 2010

A Ruined Quilt and a Thrifty Find

Here I am sitting here still awake! I am so tired but it is much easier to get things done when the babies are in bed if you know what I mean. Today was a good day but even though I did a lot today there was just SO much more I was wanting to do!  But I guess that's okay there is always tomorrow, right.  So many plans and so little time.  Do you ever feel like that? 

However, I do want to share with you something fun I did today. 

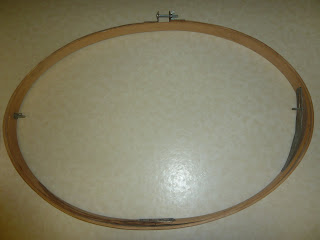
The other day while we were at the thrift store my Mom found these really great big embroidery hoops. Both of them together only cost a couple bucks.  Lucky for me she didn't have any specific plans  and was gracious enough to allow me to have them! 
And here is one of them in all of its glory:


I knew exactly what I wanted to do with them.  A couple of years ago my Aunt gave my daughter the sweetest quilt with ballerina fairies on it.  Unfortunately, the hubby someone got a little bleach happy and made holes in it.  See the darling Fairies and the yucky, bad bleach holes to the right of it?!


But that's okay! Just because it was born a quilt does not mean it has to stay a quilt!!


Soooo this poor, bedraggled, bound for the garbage quilt was reborn as a couple of lovely quilted wall hangings for my daughters room! 


I purposely left a little overhang outside of the hoop to give it the "work in progress" look and it kinda even looks like a ruffle.  They look great in her room, even better than some of the picture that I had bought to go in there (funny how it works out sometimes):)


Sunday, September 19, 2010

My Daughters Room

As I have mentioned before, we have  been working on redoing the kids rooms for a while now and finally after much work, sweat and tears (and many nights of the kids sleeping on the couch).  I am announcing that two of the rooms are completely done!  Woohoo.  With the third room not far behind.  We The hubby tore out the built in desk and wainscoting, re-mudded, smoothed and painted the walls.  Painted the trim white.  New light fixtures were put in to replace dated brass and cut glass ones and new carpet was put in a couple days ago.  We REALLY needed the new carpet our house still had the original carpet that the builder put in it almost thirty years ago. Gross, I know.

 Next comes the fun part moving all the furniture in and decorating!  YAY!  I am so excited to share all of the rooms with you very soon, but for now here is my youngest daughters room, what do you think?  Fit for a princess?!:) She thinks so!

We used this argyle wall tutorial that I found on Design Dazzle;  all you have to do is leave off the dotted line to make it a harlequin pattern.  The colors on the wall are Valspar's Snow Paw and Salmon Bisque.  I can't remember off of the top of my head the name of the blue color that we used on the ceiling but,  if you really want to know just ask and I'm sure I can dig it up somewhere.


Saturday, September 18, 2010

Halloween Wreath

Have you noticed that everywhere you look Halloween stuff is popping up!  I can't believe it is already that
time of year again!  I am really excited about Halloween but I bet you can't guess why...because I LOVE CANDY CORN Mm mm, I can't wait.  Last year I didn't get to the store to buy candy until the day before Halloween and all the regular candy corn was gone:( All they had left was flavored candy corn, chocolate and caramel apple.  I bought it anyway because, well you know, beggars can't be choosers and it was YUCK! So gross! Oh the disappointment.  I will never do that again.  I learned there is no substitute for good ol' regular candy corn. 
So in anticipation of candy corn season I have been picking up some little things here and there while out shopping to add to my Halloween decorating stash;

.
but they have been

 just sitting here lonely

  in a bag 
             
 waiting for inspiration to strike.

Until yesterday right before it was time to get ready for work then I knew exactly what I wanted to do with it.  That is some inopportune timing!  And I could not wait so I rushed around, pulled all of my stuff out and feverishly went to work like the mad scientist on Frankenstein.  


I used a little of this


And one of these


I then used my glue gun to glue this lovely black boa around it.


And then Ah HA! My work is complete, my creation realized!


Well, actually it was much cuter and looked a little less scary and a little more like this...

I can't wait to put it on the front door for trick or treaters!

Thursday, September 16, 2010

Thrifty Finds

For those of you who don't know I have been working on my kids rooms for some time now.

No seriously, it seems as if we have been working on them Forever!

And, to make sure that no detail is left without proper attention paid to it, I have spent many thrifting hours looking for things with maximum potential and at a minimum price to decorate them up a bit. Here are a few of my finds:


So thrifty in fact that I found this in my Mom's garage.  Is that considered cheating? Just needed a little TLC and it is sturdy again.  I really love the shape.


And this cute three drawer Vintagey type file cabinet.  I YUV the hardware on it!  Don't you think this would make a darling night stand in a little boys room, I do :)

Thanks for lookin'

Tuesday, September 14, 2010

What I've been up to...

So what have you been up to that is sooo important that you neglect your new blog you ask? 


            Well, a whole lot and I hope to show you everything soon!


 But for now I have a confession to make...I have been playing in chalkboard paint.


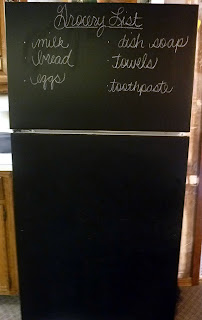
It seems as if everybody has tried their hand at it.  I have been seeing everything painted with it!  From canisters, walls, doors and everything in between.  I have to say that I truly love it and have been so inspired by all the wonderful things I have seen done with it that I could seriously have something in every room painted with it.  But for now I'll just settle on the refrigerator. Yes, I said refrigerator...Yes, I know I'm crazy but check this out:


This is what it looked like before, nothing fancy and in need of being replaced by a nice BIG stainless steel one.  However, I have ZERO refrigerator funding so I decided to make it into something that I can live with for a while longer:)


  • I started by removing the hardware off the front of the refrigerator.  It was very easy, the handles just screwed right off. 
  • I gave the front a good scrub with fine grit sand paper to tone down some of the texture and also to give the paint something to adhere to. 
  • Next I taped off the edges with painters tape because I only wanted the front to be the chalkboard.
  • I then primed with Kilz oil based primer
  • Don't forget to sand in between coats! (you want it as smooth as   possible)
  • I did three coats of the chalkboard paint with a small roller brush.

I think that I like it even more without the handles so I'm just going to leave them off.

 And VOILA!

I think it turned out well and I like it so much better than before don't you:)
O yea and the kids love it too!

Wednesday, September 1, 2010

A Thrifting we will go...a thrifting we will go dadada da do

          SCORE!! YEeeessS! That is right I'm singing a happy song tonight!  After a long search... I have found the perfect dresser for my daughter today at the thrift store.  I knew exactly what I wanted but all I've been able to find
since I started looking a couple months ago were much bigger than I had in mind...UNTIL today. It is in really good condition and has a lovely mirror too.