Do you LOVE chandeliers as much as I do??? Well, If you said yes, then you have to see this!

The moment I found this chandelier at the thrift store my wheels started turning! I know you all have probably seen these standard builders chandeliers before! BORING!!!

But with the help of my hubby I am going to show you how to take this chandy from drab to fab in step by step instructions.
First you start by unthreading the wires from the top of the chain to the ring on the top of the chandelier.

This is what it should look like with the wires unthreaded all the way down to the ring.

Now we must take it apart. So start by unscrewing the fenniel which is on the bottom of the chandelier.

Next the top should just pull up but with all the wires attached.

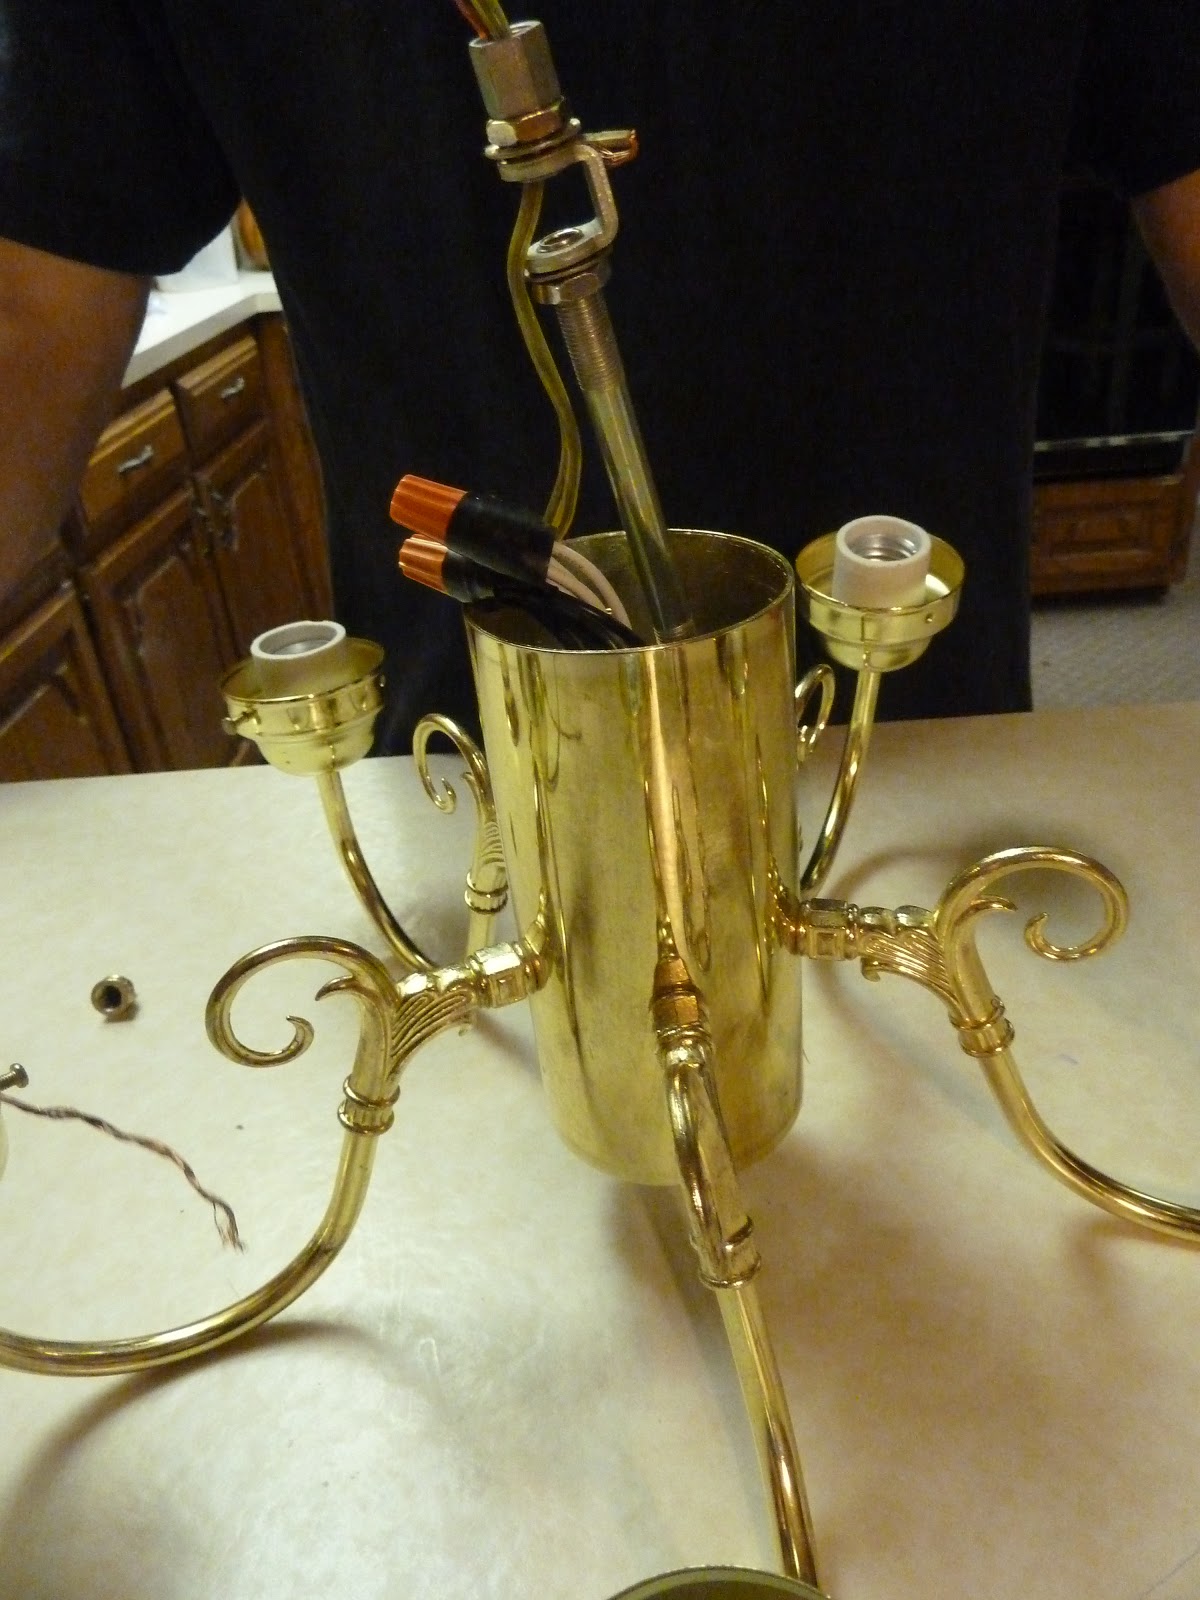
The ring should then be unscrewed from the center shaft that runs through the body. Then pull the wires down through the ring. This is what the top looks like after the wires are removed and the ring is unscrewed.

This in turn frees the rod that runs through the body of the light fixture. Now flip the rod over and feed it along with the wires back through the body of the chandy in the opposite direction until it all comes out at the other side.

See how the arms are now facing up?!
Now feed the wires back through the top cap and ring.

The hubby says to check each wire one at a time by gently pulling on it to make sure that it is not loose. If a wire pulls out of the cap it will not be safe to use! So it is important to check.

You are almost done!
Screw the top cap back on and then the fenial. Don't forget to run the wires back through the chain as well.

Ta Da!!! Now it is flipped over!

Now it is time to grab the spray paint and have a PARTY! But do remember to cover the sockets with tape before spraying!
And here is the finished product!


Chandy= a couple dollars
spray paint= a couple dollars
The Look= Priceless:)
I used decorative light bulbs but this would be just darling with lamp shades.
They are inexpensive and can really change the look.
What color would you do yours? I can't wait to see!
So cute !!!! I'm wishing I hadn't thrown out one we had like that... mine would be LAVENDER of course !
ReplyDeletethanks for sharing,
gena
www.thehouseonlavenderhill.blogspot.com
That's adorable! I love the spray paint color you chose. Thanks for sharing!
ReplyDeleteLauren
http://31diy.blogspot.com
The color is very fun! Great idea to think of flipping it over.
ReplyDeleteMy light, almost like yours is partially taken apart because I am so sick of that shiny gold....ick, I needed to see this to go ahead with the plan!! thanks
ReplyDeleteI never would have thought about turning it over. It turned out absolutely adorable!
ReplyDeleteValerie
Very nice! I love the color you chose!
ReplyDeleteOkay! I'm LOVING the color you chose! It turned out darling! Great job!! :) Thanks for linking up to Sassy Sites "trash to treasure Tuesday!!"
ReplyDeletexoxo
Marni @ Sassy Sites!
Looks so good; what a clever girl you are!
ReplyDeleteHow did you decide on the colour?
Sue @ Beach Bungalow
xo
What a great idea!! I LOVE it!
ReplyDeletevery very cute! I love a good chandy makeover!
ReplyDeleteI'm getting ready to do this to all our light fixtures in the whole house. We need to scrape our popcorn ceilings and will be adding can lights, but until that happens I need to make what we have work. Thanks for giving me that extra push to get it done :)
ReplyDeleteLove the color!
ReplyDeleteLOVE this re-do! Found your post via BCD link party! Hope you'll come over and visit SewWoodsy.blogspot.com
ReplyDeleteHi. I'm your newest follower from the Wednesday link up. Lovely blog:) You can find me at www.bouffeebambini.blogspot.com
ReplyDeleteI would LOVE that for my daughters nursery:)
Oh I'm so in love with that color, next to pink of course. Bet you get lots of compliments on it!
ReplyDeleteOH. MY. GOSH! I just did the exact same thing with the exact same chandeliers!!!! I didn't take mine all apart though. I just twisted the arms around so they were facing up instead of down. Awesome! I love the turquoise. I'm still debating on color. Mine are white for now.
ReplyDeleteI love this! I've always wanted a painted chandelier in my apartment, but since its owned by the school I can't really put one in there :(
ReplyDeleteI am going to save this for later tho! Great tutorial. Saw you on Making Monday's Marvelous @ C.R.A.F.T.
I am now following your blog :)
Great job! I will be featuring you tonight!
ReplyDeleteBonnie :)
That looks fabulous! And I never would have thought of spray painting it that color. I'm sharing with a friend who loves that color.
ReplyDeleteBrittany
http://www.prettyhandygirl.com
Wunderbar! I have a chandy just like this one in brushed nickle. I've been looking at it for the last couple of months wondering if i could flip it around...and lo! I see your post featured on House of Grace! Thank you so much for sharing!
ReplyDelete~Clarissa Emily @ A Little Stone House
P.S. New follower! :)
Found this a few days ago. We have (HAD!) the same exact light fixture- here's what we did to ours in our kitchen:
ReplyDeletehttp://lovepeoplelikethings.wordpress.com/2010/10/19/chandelier-makeover/