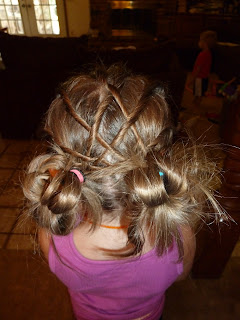
I know this is quite a bit off topic for me but I knew you had to see this. I have recently stumbled across a blog that has sent my creative juices flowing! The Story Of A Princess and Her Hair(PrincessHairstyles.com) is written by a mother showcasing all of her fabulous hair designs that she has created for her daughter. Now this woman is CRAFTY, not in the sense of the word that I have known but, this definitely is a craft...art made from hair!
Who knew there was so much more than ponytails and clippies, where were you when I was a child! Any little girl is guaranteed to feel like a princess with one of these "do's"!
I just want to say a BIG thank you to this hair doin' Mama that writes this blog for helping me to see that there are so many ways to do kids hair! My girls and I had a blast today trying out one of these super do's!!!
Monday, October 11, 2010
Saturday, October 9, 2010
A Little Halloween Inspiration...
With it being October I am feeling a little fallish...Okay a lot fallish, especially today even though where I live it only feels fallish every other day! Oklahoma weather definately puts the "trick" in "trick or treat! Yes, I know I'm a little behind and yes I have been seeing all of this gorgeous fall decor! I LOVE IT! There are so many really great ideas out there that I find so inspiring!
Here are some that I love. Thought I'd share them with ya'll:)
How about this bone mantel display from Martha Stewart Living. Who knew that something as creepy as bones could look so classic! Martha definitely has some talent working for her! This is my favorite!
Inspiration, Ahh like a breath of fresh air! Thanks for stopping by!
Here are some that I love. Thought I'd share them with ya'll:)
How about this bone mantel display from Martha Stewart Living. Who knew that something as creepy as bones could look so classic! Martha definitely has some talent working for her! This is my favorite!
Beautiful!
Would be great at a party!
This could so easily transition from Halloween theme to every day living.
Just love these things!
Everybody needs a little sparkle!
So cute!
Labels:
fall,
Halloween,
inpiration
Wednesday, October 6, 2010
Cedar Chest Makeover
Once upon a time...
I found this little beauty in a thrift store for $15 dollars.
What?! Not such a beauty you say!
Well, that's because she just needs a little makeover!
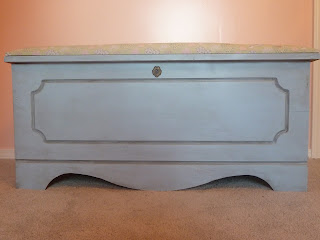
To become this...
And here is an up close picture of the fabric that I used to upholster the top of the cedar chest. It was left over from my daughters crib bedding so it is extra special to me. This chest is for my daughters room.
And she lived happily ever after! Well, almost but lets take a look at the makeover process!
and
Here is how I got the look:
- I skipped sanding this time and went straight to priming I used Kilz oil based spray paint to prime but for some reason half way through the bottle it started coming out in blobs and made the chest look texturized. But luckily it was easily fixable, it sanded right off and left enough primer on for the paint to stick:) Whew!
- I gave it two coats of Valspar's Windsor Way (looks like it should be named Cinderella Blue to me but... hmm what a fun job that would be naming paint colors!) I did water it down a little bit. This helps the paint to dry smoothly instead of having all those yucky bristle marks made from the paint brush.
- I gave it a good wax on/ wax off of antiquing glaze making sure to focus on the details in the wood.
- finished it off with 2 thin coats of poly. OOPS! I forgot to lightly sand around the details! I just grabbed my little sanding pad and sanded anyway, then just very lightly reapplied the poly over these areas. No harm done!!
Labels:
cedar chest,
furniture,
makeover,
painting,
redo,
repurposing,
thrifting,
toy box
Sunday, October 3, 2010
Fabulous, Inexpensive and Simple Chandelier Makeover
Do you LOVE chandeliers as much as I do??? Well, If you said yes, then you have to see this!
The moment I found this chandelier at the thrift store my wheels started turning! I know you all have probably seen these standard builders chandeliers before! BORING!!!
But with the help of my hubby I am going to show you how to take this chandy from drab to fab in step by step instructions.
First you start by unthreading the wires from the top of the chain to the ring on the top of the chandelier.
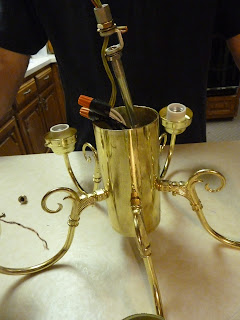
This is what it should look like with the wires unthreaded all the way down to the ring.
Now we must take it apart. So start by unscrewing the fenniel which is on the bottom of the chandelier.
Next the top should just pull up but with all the wires attached.
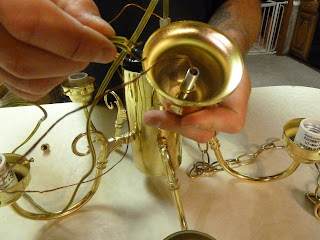
The ring should then be unscrewed from the center shaft that runs through the body. Then pull the wires down through the ring. This is what the top looks like after the wires are removed and the ring is unscrewed.
This in turn frees the rod that runs through the body of the light fixture. Now flip the rod over and feed it along with the wires back through the body of the chandy in the opposite direction until it all comes out at the other side.
See how the arms are now facing up?!
Now feed the wires back through the top cap and ring.
The hubby says to check each wire one at a time by gently pulling on it to make sure that it is not loose. If a wire pulls out of the cap it will not be safe to use! So it is important to check.
You are almost done!
Screw the top cap back on and then the fenial. Don't forget to run the wires back through the chain as well.
Ta Da!!! Now it is flipped over!
Now it is time to grab the spray paint and have a PARTY! But do remember to cover the sockets with tape before spraying!
And here is the finished product!
Chandy= a couple dollars
spray paint= a couple dollars
The Look= Priceless:)
I used decorative light bulbs but this would be just darling with lamp shades.
They are inexpensive and can really change the look.
What color would you do yours? I can't wait to see!
Subscribe to:
Comments (Atom)


